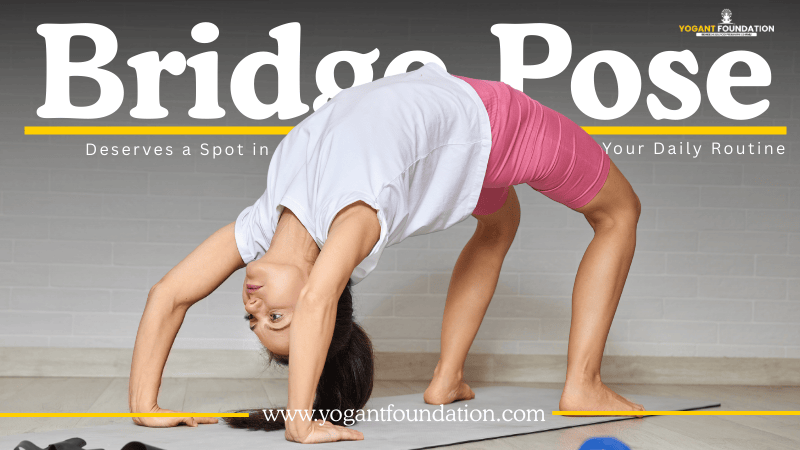
Complete Guide to Bridge Pose | Setu Bandhasana
Let’s be real for a second. When was the last time you actually thought about your glutes? Or the back of your neck? If you’re like most of us, probably not during your morning coffee run | Bridge Pose
But here’s the thing: if you sit at a desk all day, or even if you’re on your feet, your body is crying out for a movement it rarely gets. That movement is a nice, conscious backbend.
I remember the first time I really “found” Bridge Pose. I wasn’t in a fancy yoga studio. My living room floor, frustrated after a long day of work, just trying to stretch my tight hip flexors. I rolled onto my back, planted my feet, and lifted my hips. And honestly? It felt like I had unlocked a secret door in my spine.
That’s the magic of Setu Bandhasana. It’s simple enough for a beginner, but if you do it with intention, it can be a total game-changer for your body. Let’s talk about why this pose, also commonly known as Bridge pose yoga, should be your new best friend.
What Exactly is Bridge Pose?
So, let’s break down the name. In Sanskrit, Setu means bridge, Bandha means lock, and Asana means pose. So, Setu Bandhasana literally translates to “bridge lock pose.” You’re building a bridge with your body.
But it’s not just about making a shape. It’s about creating a “lock” of energy. You’re engaging your legs and glutes to lift your torso, opening the front of the body (the chest and hips) while strengthening the back.
When I teach this in classes, I always tell people to visualize an actual bridge. Is it rigid and brittle? No. A good bridge has strength and flexibility. It sways gently in the wind but holds firm under pressure. That’s exactly how your spine should feel in this pose.
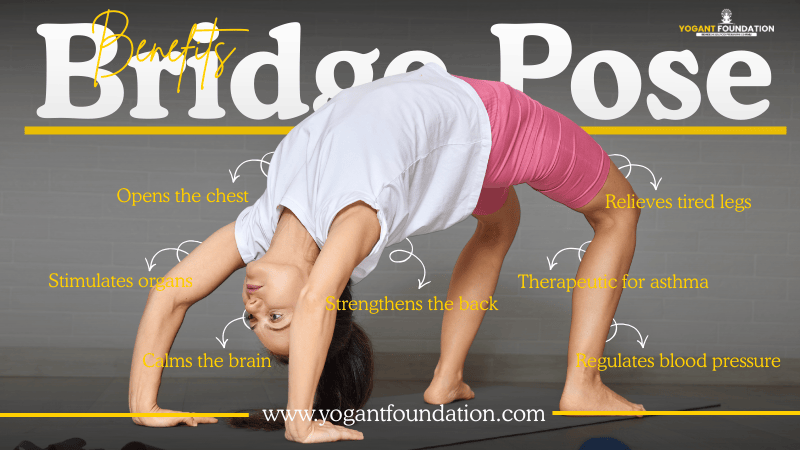
The Real Setu Bandhasana Benefits | The Ones You’ll Actually Feel
I could list off a bunch of anatomical terms here, but let’s focus on what you care about: how does this pose make your life better?
1. It Undoes the “Desk Slouch”
We spend hours hunched over laptops and phones. This shortens our chest muscles and rounds our upper back. When you lift into Bridge Pose, you’re actively opening the chest and shoulders. It’s the ultimate antidote to poor posture. After holding this pose for a few breaths, sit up straight and notice how your shoulders automatically roll back. That’s the bridge pose benefits kicking in immediately.
2. It Wakes Up Your Sleeping Glutes
Sitting all day basically turns your glute muscles “off.” This forces your lower back to take on extra weight, which is a recipe for pain. Bridge Pose is a fantastic way to remind those glutes how to fire up. A strong butt equals a happy lower back. It’s that simple.
3. It Calms a Racing Mind
This might sound like yoga mumbo-jumbo, but hear me out. Backbends are generally invigorating, but Bridge Pose (especially when done with support) can actually soothe the brain. It’s considered a mild inversion (your heart is higher than your head), which can help reduce anxiety and fatigue. On days when I feel scattered, holding Bridge Pose for five deep breaths brings me back to center.
4. It Gives Your Digestion a Nudge
Because you’re creating compression in the belly when you lift up, and then releasing when you lower down, you’re essentially massaging your abdominal organs. This can help stimulate digestion. If you’re feeling a bit bloated, a gentle Bridge Pose flow can work wonders.
How to Do Bridge Pose | The “No-Nonsense” Guide
Alright, let’s get down to business. Rolling onto your back and throwing your hips up isn’t going to cut it. Here is how to do it with proper alignment so you actually feel the good stuff.
Step 1: The Setup
Lie on your back. Bend your knees and plant your feet on the floor, hip-width apart. Take a second to check your feet. Can you brush your heels with your fingertips? If not, scoot your feet a little closer to your sitting bones. Your ankles should be directly under your knees.
Step 2: The Grounding
Press down firmly through all four corners of your feet. Don’t let your ankles roll out. Arms are alongside your body, palms facing down. Use those arms as brakes—they help you lift higher without slipping.
Step 3: The Lift
Inhale, and press into your feet to lift your hips. It’s not a “throw.” It’s a controlled peel-off-the-mat motion. Lift until your thighs are more or less parallel to the floor.
Step 4: The Action
Here’s where the magic happens. Instead of squeezing your glutes so hard you get a cramp, think about lifting your tailbone toward the back of your knees. Roll your shoulders underneath you one at a time to get your chest closer to your chin. Interlace your hands under your back if that’s comfortable.
Step 5: The Stay
Hold for 30 seconds to a minute. Breathe. On an exhale, slowly roll your spine back down, one vertebra at a time.
Common Mistakes | How to Fix Them
I see these mistakes all the time in my classes. Let’s make sure you avoid them.
- The “Toes Forward” Flaw: When you lift up, your knees tend to drift forward past your toes. This puts pressure on the knees and takes the work out of the glutes. Cue: Keep your shins vertical. Imagine you’re balancing a cup of water on your front thigh—you don’t want it to spill forward.
- The “Bum Clench”: Yes, you need to engage your glutes, but squeezing them to death actually blocks your lower back. You want length in the lower back, not compression. Think about lifting up rather than squeezing in.
- The “Neck Wringer”: Turning your head side to side while in the pose is a big no-no. You’re putting weight on your cervical spine. Keep your gaze soft, looking toward your chest. The neck should be neutral.
Spicing It Up | Variations to Try
Once the basic pose feels stable, you can explore a bit.
Supported Bridge Pose | The Relaxation Version
Grab a yoga block or a thick, hardcover book. After you lift your hips, slide the block under your sacrum (the back of your pelvis). Adjust the height to whatever feels good. Then, just let your body go. Relax your arms. Stay here for 2-3 minutes. This is less of an active exercise and more of a restorative hug. It’s incredible for stress relief.
One-Legged Bridge Pose | Eka Pada Setu Bandhasana
Once you’re lifted, extend your right leg toward the ceiling. Keep your hips level—don’t let the lifted side sag. This fires up the standing leg and challenges your balance. Hold for a few breaths, then switch.
Wheel Pose | The Big Sister
If Bridge Pose feels easy, you might be tempted to jump to Full Wheel. Take it slow. Wheel is a much deeper backbend that requires open shoulders and hip flexors. Master Bridge Pose first, and maybe practice with a teacher before going all the way up.
Bridge Pose vs Wheel Pose | What’s the Difference?
A lot of people confuse these two, but they are very different animals.
Bridge Pose is a backbend, yes, but the weight rests on your shoulders. The crown of your head stays on the mat. It’s about strengthening and opening.
Wheel Pose is a deep backbend where the crown of the head lifts off the floor, and you’re supporting yourself on your hands and feet. It requires a lot more spinal flexibility and arm strength.
Think of Bridge Pose as the foundation. You wouldn’t build a house on sand, and you shouldn’t try Wheel Pose without a strong, stable Bridge.
Integrating Bridge Pose Into Your Day
You don’t need an hour-long yoga practice to get the bridge pose benefits. Here’s how I fit it into a busy schedule:
- Morning Wake-Up: Right after I get out of bed, before my back tightens up. Three rounds of lifting and lowering with the breath. It’s better than coffee.
- Desk Break: If I’ve been sitting for two hours straight, I’ll take a 2-minute break. I don’t even change clothes. I just get on the floor, do Bridge Pose, and maybe add a gentle twist. It resets my posture instantly.
- Pre-Bedtime Wind-Down: I’ll do the supported version with a bolster or pillow. It helps release the tension of the day and preps the body for sleep.
Frequently Asked Questions
Q: Is Bridge Pose safe for beginners?
A: Absolutely. This is one of the easiest backbends. Focus on keeping the feet parallel, and stacking your knees over your ankles. Don’t go higher than your body feels comfortable.
Q: Can Bridge Pose help with back pain?
A: It can, but it depends on the type of pain. If you have back pain from sitting too much (tight hip flexors, weak glutes), this pose is excellent. Check with your doctor or physical therapy first if there is a serious injury to the disc, a herniation of the disc, or severe acute pain.
Q: How long should I hold Setu Bandhasana?
A: To strengthen your muscles, you can hold the position for between 30-60 second. You can hold (with help) for up to 3-5 minutes.
Q: Why do my knees hurt in Bridge Pose?
A: Your feet may be too far from your body or your legs are spread out. Be sure that you are placing your feet directly beneath your knees, and your knees should be pointing straight forward.
Q: What muscles does Bridge Pose work?
A: It primarily strengthens the glutes (butt), hamstrings (back of thighs), and spinal extensors (lower back). It also stretches the chest, neck, and spine.
Q: Can I do Bridge Pose during pregnancy?
A: Generally, yes, it’s considered safe in the second trimester, but it should be avoided in the third as lying on the back for too long can compress a major vein. Always consult your prenatal yoga instructor or doctor.
The Takeaway
Look, I’m not saying Bridge Pose is going to solve all of life’s problems. But it might just solve that ache in your lower back after a long day. It might just give you that moment of stillness you desperately need.
It’s a bridge, after all. It connects the lower body to the upper body, the effort to the ease, and the stress of your day to the calm of your evening. So next time you’re on your mat—or your living room floor—give Setu Bandhasana a little extra love. Your spine will thank you.