Let’s be honest. When you first see a picture of someone in Janu Sirsasana —forehead resting peacefully on their shin, body folded like a soft letter “C”—it can feel a bit intimidating. We think, “My body could never do that.” I get it. I used to sit on my mat, staring at my seemingly miles-away feet, feeling a mix of determination and defeat.
But here’s the secret I wish someone had told me: This pose, and its beautiful side-bending sibling Parivrtta Janu Sirsasana, aren’t about touching your head to your knee. They’re about the journey in between. They’re about learning to listen, to soften, and to find quiet in a noisy world.
Whether you’re here because your hamstrings feel like tight guitar strings, your mind won’t stop racing, or you’re just curious about the benefits of janu sirsasana, you’re in the right place. This isn’t a robotic manual. It’s a conversation. We’ll walk through the janu sirsasana steps together, discover what makes this pose so special, and I’ll share all the janusirsasana information in English you need, not in yoga-master speak, but in plain, human terms. Let’s begin.
What is Janu Sirsasana? Decoding the Pose
Before we twist ourselves into knots (pun intended), let’s break down the name. It sounds fancy, but it’s just Sanskrit, yoga’s ancient language.
- Janu means “knee.”
- Shirsha means “head.”
- Asana means “pose” or “seat.”
So, Head-to-Knee Pose. Simple, right? But the magic isn’t in the destination (the head meeting the knee); it’s in the path you take to get there. It’s a seated forward fold where one leg is long, and the other is bent, your foot tucked in close.
Then there’s the revolved version, Parivrtta Janu Sirsasana (par-ee-VRIT-tah). “Parivrtta” means “revolved” or “turned around.” Imagine instead of folding straight forward, you make a graceful, opening arc to the side, like you’re curving around the surface of a large ball. It feels completely different—it’s energizing where the classic fold is calming.
Foundational Alignment: Janu Sirsasana Steps Guide
Forget the perfect Instagram shot. Let’s talk about how this pose feels in your real body. Here are the janu sirsasana steps, phrased as gentle invitations, not commands.
Step 1: Starting Position
Sit down on your mat and stretch both legs out in front of you. Take a moment. Wiggle a bit. Feel your sitting bones (those two bony spots under your hips) pressing down. If your back is rounding or you’re tipping backward, please sit on a folded blanket or a firm cushion. This is non-negotiable for comfort. It’s like lifting the foundation of a house so the walls (your spine) can be tall.
Step 2: Setting the Base
Gently bend your right knee and let it fall open to the side. Draw your right foot in, placing the sole against your inner left thigh. Where it rests is perfect. It could be at your thigh, your calf, or even near your ankle—no pressure. Let the right knee relax toward the floor. Don’t force it.
Step 3: Aligning the Torso
Inhale deeply. Feel your chest lift and your spine grow an inch longer. Imagine a string pulling the crown of your head up to the ceiling. This isn’t just preparation; this is the pose already working.
Step 4: The Forward Fold
As you exhale, tip forward from your hip joints, not your waist. Lead with your heart, not your nose. Your goal is to keep that beautiful, long spine as you descend. Your hands can walk forward on the floor, hold your left foot, or rest on your shin.
Big Tip: If your back is rounding into a hump, stop. Take a deep breath in to lengthen, and maybe bend your left (straight) knee a little. A bent knee with a long spine is infinitely better than a straight leg with a rounded back.
Step 5: Breathing and Releasing
Hold for 5-10 breaths. But don’t just count. Feel.
- Inhale: Create a tiny bit more space. Lengthen.
- Exhale: Let go of any tension you’re holding in your shoulders, jaw, or that determined frown.
There is no “final shape.” The true pose is the sensation of release along the entire back of your body.
Step 6: Repeat on the Other Side
To release, inhale and lift your torso slowly, as if you were unrolling yourself with dignity. Don’t jerk up. Then, gently shake out your legs and do the other side.
Introducing the Twist: How to Practice Parivrtta Janu Sirsasana
Feeling a bit more open? Let’s try the revolved version. It’s like a sigh of relief for your sides.
- Start in the same setup: left leg long, right foot tucked in.
- Inhale and sweep your left arm up by your ear, stretching your whole left side.
- Exhale and, as if you’re sliding along a curved wall, side-bend to the right. Your left arm reaches over your ear, heading toward your right foot. You’ll be looking at the ceiling or the wall behind you—it’s a wonderful, open feeling.
- Rest your left hand wherever it lands—your shin, a block outside your right leg, or the floor.
- Feel the incredible stretch along your left ribs, waist, and arm. Breathe into that space. It might feel intense, but in a “good-opening” way.
- After a few breaths, inhale back to center. Feel the difference between your two sides? That’s normal. Switch sides.
A Treasure Trove of Benefits: Why Practice These Poses?
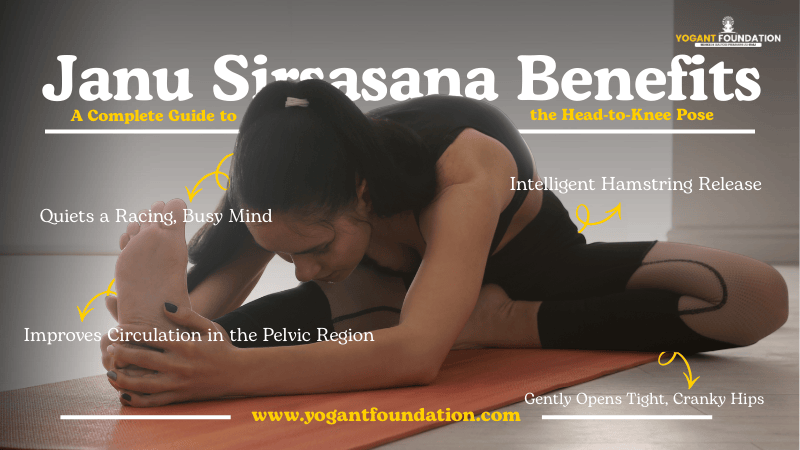
You might be thinking, “Okay, but what’s in it for me?” The janu sirsasana benefits are surprisingly down-to-earth. This isn’t just about touching your toes.
Physical Benefits of Janu Sirsasana
- Hello, Hamstrings! It gives a deep, focused stretch to the backs of your legs, which is a gift if you sit at a desk all day.
- Hip Help: That bent knee position is a gentle, no-pressure opener for tight hips.
- Back Love: When done with a long spine, it can ease mild lower back tension by gently stretching and decompressing the vertebrae.
- A Mini Massage: Folding forward softly compresses your belly, which can wake up a sluggish digestive system. Think of it as a gentle nudge for your inner organs.
- The Ultimate Chill Pill: This pose triggers your body’s “rest and digest” mode. It tells your nervous system, “Hey, we can relax now.” This is perhaps the most powerful of all the benefits of janu sirsasana.
Benefits Specific to Parivrtta Janu Sirsasana
- Side Body Liberation: It stretches muscles you probably never think about—the ones between your ribs and along your waist. It creates space you can actually feel when you take a deep breath.
- Posture Perfecter: It counteracts the hunch we all get from phones and computers by opening the chest and shoulders.
Mental and Energetic Janu Sirsasana Benefits
This is where these poses truly shine for me.
- They Teach Patience. You can’t bully your way into them. You have to breathe, wait, and allow.
- They Quiet the Noise. The forward fold, in particular, creates a physical boundary from the world. It’s like creating a small, dark, quiet room for your brain. Anxiety and busy thoughts often soften here.
- They Build a Kinder Inner Dialogue. You learn to work with your body, not against it. You replace “Why can’t I go farther?” with “What do I feel right now?”
Essential Practice Tips for Safety and Depth
I’ve made all the mistakes so you don’t have to. Here’s my heartfelt advice:
- Your Best Prop is a Blanket. Seriously, sitting up high changes everything. It’s the difference between struggle and ease.
- A Strap is Your Friend, Not a Cheat. If reaching your foot makes you hunch, loop a strap around your foot and hold the strap. Your mission is to keep your heart open, not to grip your toes.
- Listen to the Whispers, Not the Screams. A deep, burning stretch in your hamstring? That’s your edge. A sharp, shooting pain in your knee or back? That’s your body yelling “STOP.” Honor that.
- Who Should Be Cautious? If you have a current knee or hip injury, or a serious back issue (like a herniated disc), talk to a doctor or a very experienced teacher before practicing. If you have diarrhea or are in the late stages of pregnancy, it’s best to skip the deep compression.
Weaving the Poses into Your Practice
You don’t need a 90-minute class. Try this:
After a long day, roll out your mat for just 5 minutes. Sit on your blanket, come into Janu Sirsasana on each side for a few breaths, and just notice. Notice the tightness, the release, the rhythm of your breath. That’s a complete practice. It’s a reset button.
Follow it with simply lying on your back with your knees bent for a minute. Feel the difference in your body and mind.
Conclusion: A Journey, Not a Destination
The most important piece of janu sirsasana information in English I can give you is this: Your version of the pose is perfect.
It doesn’t matter if your nose is at your knee or a foot away. What matters is that you showed up. You breathed. You listened. Gave yourself a moment of quiet in a demanding world.
Janu Sirsasana and Parivrtta Janu Sirsasana are not about achieving a shape. They are about the gentle, powerful conversation you have with yourself on the way there. So, unroll your mat, grab a blanket, and just see what happens. Your body—and your busy mind—will thank you for it.