Gomukhasana Introduction – The Complete Guide
Gomukhasana (or Cowface Pose) is one of the most graceful and beneficial yoga poses. Its name derives from Sanskrit, “Go” (cow) and “Mukha” (face), as the pose of the arms and legs resembles a face.
The asana does not simply focus on flexibility. Instead, it is about inner alignment and physical balance. Gomukhasana is a pose that can be practiced as part of Hatha Yoga.
In this detailed guide, we’ll explore:
- Gomukhasana – Meaning, origin, and significance
- How to do it right: Step-by-step instructions
- The benefits of meditation are both physical, mental, and spiritual.
- Warnings and Contraindications
- Variations and Modifications For All Levels
- The Science behind the Pose
- Include Gomukhasana as part of your regular yoga practice
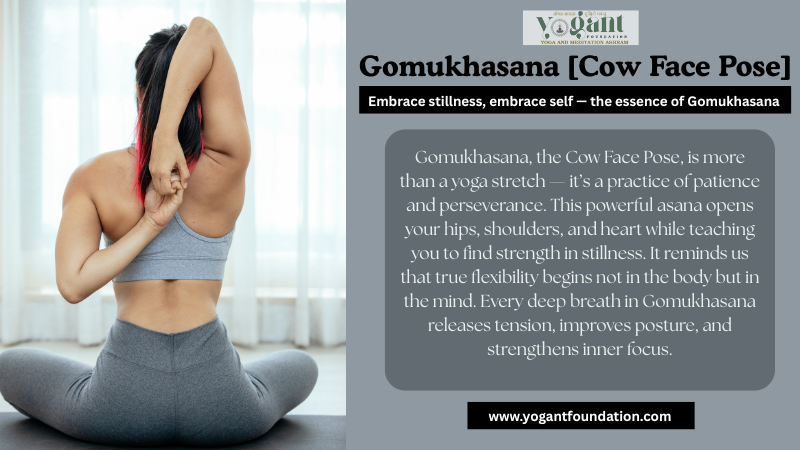
The Cow Face Pose, Gomukhasana.
What is Gomukhasana?
Gomukhasana, also known as the Cow Face Pose, is a yoga pose that involves interlocking your hands and crossing your legs. It is unique in that it resembles the shape of a cow’s face. Crossed thighs form the mouth and arms, the horns.
It is a Hatha Yoga classic that harmonizes each side of the body. Stretching the hips and shoulders as well as the chest and arms creates an overall sense of balance.
Sanskrit Breakdown:
- Go = Cow
- Mukha = Face
- Asana = Posture
Together, Gomukhasana refers to “the position resembling the cow’s facial expression.”
The Origin and Significance of Gomukhasana
Gomukhasana is a yoga pose that has ancient Indian roots. This pose is found in classic Hatha Yoga texts like the Hatha Yoga Pradipika or the Gheranda Samhita. They emphasize that the pose promotes free movement of (vital energy) and opens the energy channels.
The cow in Indian culture is regarded as a sign of tranquility, nutrition, and motherhood. Gomukhasana can help you to instill these qualities — balance, patience, and compassion.
Modern yoga combines physical alignment and emotional release. It is particularly helpful to people who have tight shoulders or hips as a result of long periods spent sitting.
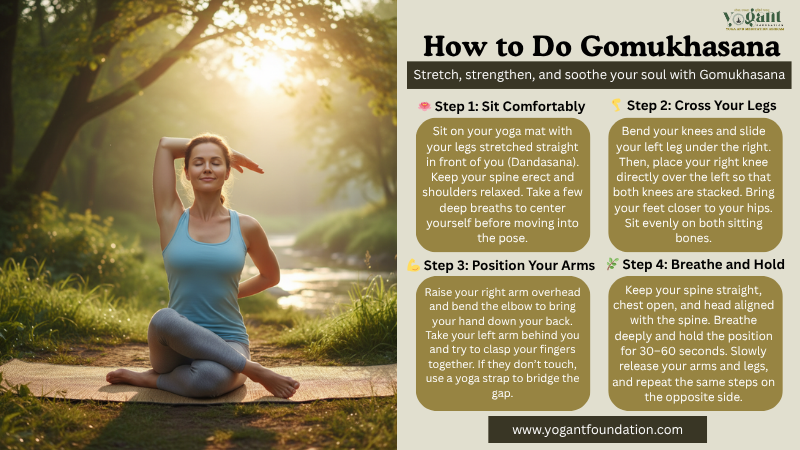
How to Do Gomukhasana Step-by-Step
1 Step: Start Position
- With your legs in front, sit in Dandasana.
- Straighten your spine, and keep your shoulders relaxed.
2 Step: Cross Your Legs
- You can also bring your foot to the outside of your hip by bending your knees.
- Next, bring your left foot up to the hip and place your right heel directly on top of your left.
- Two knees should be pointed forward and both stacked.
Tip: When your hips hurt, you can elevate your pelvis by sitting on a folded towel.
3 Step: Position Your Arms
- Lift your Right Arm above your head and bend your elbow so that your right palm reaches your back.
- Put your left hand in front of you and clasp your fingers.
- Open your chest and keep the spine straight.
4 Step: Breathe and Hold
- Face forward and keep your chin perpendicular to the ground.
- Hold the position in place for 30-60 seconds, while slowly breathing.
- You will feel the stretch on your chest, shoulders, hips, and legs.
5 Step: Release and Switch Sides
- Slowly exhale, and release your hand slowly.
- Stretch your legs out to relax.
- Continue the same procedure with your opposite arm and leg.
Alignment Tips for Gomukhasana
- Make sure that both of your sitting bones are firmly anchored on the floor.
- Keep your spine in a neutral position.
- You can use a towel or a strap to keep your hands apart.
- To support your posture, engage your muscles.
- Relax your Neck, and keep your shoulders relaxed.
The alignment is designed to maximize safety and benefits.
Modifications and Variations
1. Beginner Variation
When you cannot stack your knees or clasp your hands perfectly:
- Sit comfortably on a pillow or a block.
- You can bridge the gap by using a Yoga strap.
- Extend one leg if needed.
2. Half Gomukhasana
If you have tight hips, this is a good exercise for beginners.
- Keep one leg bent (under your body) and the other straightened out.
- It allows for gradual hip opening.
3. Gomukhasana Arms Only
When you focus on the flexibility of the shoulders:
- Practice the arm positions by sitting or standing comfortably.
- The perfect stretch for the office.
4. Cow Face Pose with Forward Bend
After becoming comfortable with your base position:
- In order to lean, slightly bend your hips forward.
- It is important to stretch the hips, thighs, and calves.
Physical Benefits of Gomukhasana
1. Opens Tight Shoulders and Chest
Gomukhasana is a great way to relieve tension in the muscles of your chest and shoulders from sitting at a desk for long periods.
2. Improves Hip Flexibility
The deep stretches of the gluteus muscles and piriformis release tightness around the hips, lower back, and lower legs.
3. Strengthens the Spine
Maintaining a straight posture will help you improve posture and strengthen your back muscles.
4. Enhances Blood Circulation
Maintaining a straight posture will help strengthen your spinal muscles.
5. Relieves Sciatica & Back Pain
You can reduce sciatica pain by stretching the hips, lower back, and muscles.
6. Improves Posture and Lung Capacity
This exercise improves the breathing posture by aligning and expanding the shoulders.
Mental and Emotional Benefits
- Relieves anxiety and stress through calming of the nervous system.
- Encourages focus and attention by controlling your breathing.
- This technique releases emotional tension stored in your shoulders and hips.
- Promotes a feel of inner harmony and balance.
Gomukhasana, a yoga posture that helps to release the emotional blockages behind tight shoulders and hips gently is often recommended by holistic yoga.
The Science Behind Gomukhasana
Gomukhasana is a specialist in:
- System musculoskeletal: Stretches the muscles of the shoulders, hips, and chest.
- Nervous systems: Activates parasympathetic responses, reducing the stress hormones.
- Improves the efficiency of the circulatory and respiratory systems.
It helps improve your body-mind connection and correct muscle imbalances.
Contraindications and Precautions
Gomukhasana should be avoided if:
- Serious shoulder, hip, or knee injuries
- Recent Surgery in the Lower Body
- Joint inflammation or arthritis?
- Serious back pain
Safety Tips:
- Before attempting a pose, warm up.
- Don’t force yourself into a posture. Move gently.
- You should consult with a Yoga instructor if there is any pain or discomfort.
Preparatory Poses for Gomukhasana
Preparing your body before attempting Gomukhasana is important.
- Sukhasana (Easy Pose)- To align and settle the spine.
- Baddha Konasana (Bound Angle Pose)- To open the hips.
- Anjaneyasana (Low Lunge)- It stretches your legs and hips.
- Garudasana Arms (Eagle Arms)- To warm the shoulders.
- Ardha Matsyendrasana (Half Lord of the Fishes Pose)– To increase spinal flexibility.
Follow-Up Poses
You can relax your muscles by doing these simple counterposes after Gomukhasana:
- Dandasana (Staff Pose)
- Uttanasana (Standing Forward Bend)
- Balasana (Child’s Pose)
- Setu Bandhasana (Bridge Pose)
You can use these to release tension from your muscles and bring back balance.
Gomukhasana in Hatha and Ashtanga Yoga
In Hatha Yoga:
Gomukhasana can be done slowly, with the focus being on alignment. This is to achieve inner stillness.
In Ashtanga Yoga:
There are advanced seated sequences that link breath and movement in order to develop flexibility and discipline.
Gomukhasana, a Buddhist monk who represents both traditions beautifully, is the perfect example of balance.
Breathing and Mindfulness in Gomukhasana
- While extending the spine, inhale deep and lengthen it.
- As you exhale, deepen your stretch.
- Your breath and your sensations are the focus of attention.
Exercises such as Pranayama can be used to improve your breathing.
- Ujjayi breathing for calm concentration
- Anulom Vulom Energy Balance
It is a posture that enhances both the physical and the spiritual aspects.
Spiritual Meaning of Gomukhasana
According to yogic thought, the cow represents divine nutrition and compassion. Performing this asana will help open up the Heart Chakra (Anahata). This chakra is connected to forgiveness, love, and emotional healing.
By sitting in Gomukhasana, with awareness, you can develop inner peace, gratitude, and humility. This will help you connect your physical body with your spiritual consciousness.
Common Mistakes to Avoid
- Slouching the back – keep your spine upright.
- Force the knees – Always move with care.
- Do not overarch the Neck – keep your chin in line.
- Unequal hips– sit on a folded cloth for balance.
- Holding your breath– keep a steady, smooth breathing.
These mistakes can be corrected to improve posture, safety, and efficiency.
Tips for Daily Practice
- Try Gomukhasana at the beginning of your day (early morning) or in the evening.
- Halten Sie the pose for between 30 and 60 seconds.
- For deeper relaxation, combine it with Hatha Yoga.
- Consistency is key- with time, you’ll find that your flexibility increases.
Integrating Gomukhasana in a Yoga Sequence
For beginners, here’s a simple 15-minute sequence:
- Sukhasana (2 min) – Centering breath
- Cat-Cow Stretch (2 min) – Warm-up
- Baddha Konasana (2 min) – Hip opener
- Gomukhasana (4 min) – Main posture
- Ardha Matsyendrasana (2 min) – Twist for spine
- Balasana (2 min) – Cool-down
- Savasana (1 min) – Relaxation
Harmony is achieved by following this simple routine.
The Therapeutic Value of Gomukhasana
Physical Therapy Benefits:
- Relieves a frozen shoulder.
- Find out how to aid in muscle recovery following injury.
- Increases joint flexibility and lubrication.
Psychological Therapy Benefits:
- Reduces mental fatigue.
- Calms restlessness. Promotes emotional stability.
- Stillness encourages mental-body awareness.
It is often prescribed in sessions of therapeutic yoga to correct posture and back problems.
Gomukhasana for Office Workers
If you sit at your desk for long periods of time, Gomukhasana should be a priority.
- Settle straight.
- Put one arm above your head and the opposite behind you.
- You can use your hands or straps to secure them.
- After 30 seconds, switch sides.
This product instantly reduces stiffness in the Neck and shoulders — without a yoga mat!
The Emotional Energy of the Pose
It is stored in our hips, shoulders, and back. Gomukhasana allows this energy to be released gently, which in turn promotes emotional healing.
If you hold the position, it is possible to feel an intense sense of relax, perhaps even tears.
Frequently Asked Questions
1. What is Gomukhasana good for?
The benefits of this exercise include improved flexibility, emotional stability, and posture. This also helps to open the heart chakra and releases tension in the hips and shoulders.
2. Who should not do Gomukhasana?
People with injuries to the knees, shoulders, or hips should not practice yoga. Consult a specialist before practicing yoga if you are pregnant, recovering from surgery, or are in the middle of a recovery period.
3. How long should I hold Gomukhasana?
Beginning users can begin with 20-30 seconds on each side. Gradually increase this to 1 to 2 minutes.
4. What is the best time to do Gomukhasana?
It is ideal to take the pill in the early morning hours or at night, when you are not hungry.
5. What are some preparatory poses?
The warm-ups, Baddha Konasana, Sukhasana Garudasana, can be great.
Final Thoughts: The Harmony of Gomukhasana
Gomukhasana goes beyond a simple yoga pose. It’s also a symbol for harmony and compassionate. It teaches how to balance the body and mind by combining flexibility and strength.
Practice Gomukhasana every day to bring clarity, calmness, and alignment – both on and off the mat. The Cow Face Pose can help you find your inner self, whether it’s for physical or spiritual reasons.
Next time you get on your mat for yoga, remember to take a breath and sit up straight. Let Gomukhasana help you realize that you can’t find balance; it is created from within.