Let’s talk about a SI joint pain in the butt. And no, I don’t mean your annoying coworker or that never-ending home renovation. I mean a real, physical, deep-seated ache right in your lower back or buttock that seems to have taken up permanent residence.
If you’re reading this, you probably know the feeling all too well. It’s that nagging discomfort that flares up when you stand up from your desk, a sharp catch when you climb the stairs, or a general feeling of instability that makes you feel like your leg might just decide to quit on you.
For years, I blamed my own lower back pain on a “slipped disc” or a “pulled muscle.” I’d point to the small of my back, convinced that was the source of all my problems. It wasn’t until a wise physical therapist asked me to point precisely to where it hurt that I discovered the real culprit. My finger landed not on my spine, but on a specific spot a few inches to the side—a spot I now know as the sacroiliac, or SI, joint.
This joint is the unsung hero—and sometimes the secret villain—of our lower body. And if your doctor, chiropractor, or your own online searching has led you to the term “SI joint dysfunction,” you’ve come to the right place.
This isn’t a cold, clinical lecture. Consider this a heartfelt guide from someone who’s been in your shoes. We’re going to demystify this confusing joint, explore why it causes so much trouble, and—most importantly—map out a gentle path to relief using one of the most powerful tools we have: yoga.
What Exactly Is the SI Joint Pain? Meet Your Body’s Brilliant Shock Absorber
Before we can fix it, we need to understand it. And the SI joint is a fascinating piece of anatomical engineering.
The “SI” stands for sacroiliac. It’s a simple name for the crucial connection point between your sacrum (that large, triangular bone at the very base of your spine) and your ilium (the big, wing-shaped part of your pelvis).
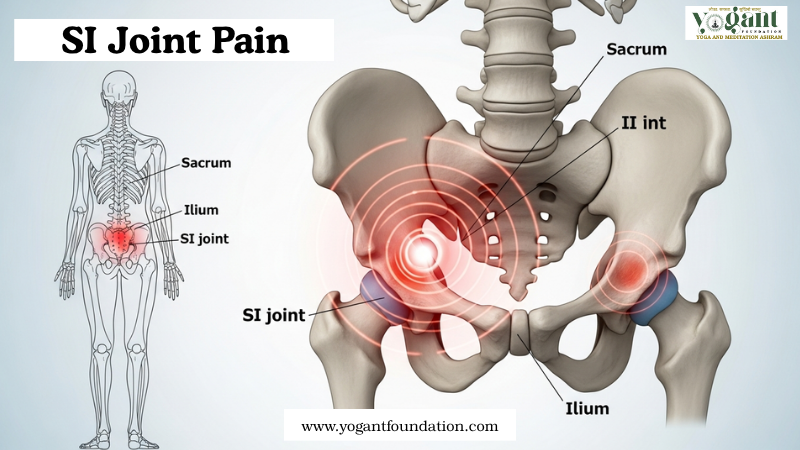
You have two of these joints—one on each side—and they have a monumental job. This is the central point where all of the weight, force and energy from your body’s upper part gets transferred to your legs and your feet. Here, you start every step and jump.
I like to think of your pelvis as a sturdy, beautiful bowl. Your sacrum is the base of your spine, designed to nestle perfectly inside this bowl. The SI joints are the intricate, interlocking seams that hold this entire structure together with incredible strength.
The Unique Design of Your SI Joint Pain
Here’s the key thing to remember: your si joint pain isn’t like your shoulder or your knee. It’s not designed for big, sweeping movements. Its superpower is stability.
It has these unique, irregular surfaces that fit together like two puzzle pieces. They’re held in place by the thickest, strongest ligaments in your entire body. Think of these ligaments as nature’s most durable seatbelts, strapping the joint firmly in place.
They allow for just a tiny, barely-there amount of movement—a mere 2-4 millimeters. This micro-movement is your body’s built-in shock absorber. It’s what lets you walk on a hard sidewalk or run for the bus without jolting your spine with every single step. It’s a masterpiece of design, until it isn’t.
SI Joint Pain vs. Other Back Pain: How to Tell the Difference
This is where things get tricky. The pain from an unhappy SI joint pain is a master of disguise. It can feel like a pulled muscle, a herniated disc, or even sciatica. So, how can you start to play detective and see if your SI joint pain is the prime suspect?
Here are the tell-tale signs my therapist taught me to look for:
The “Point Test”:
The pain is usually one-sided (though it can be on both). It’s not a general ache in the low back. It’s a specific, deep, often dull pain directly over the buttock. If you find your “dimples of Venus” on your lower back, the pain is often just to the side of them. Can you point to one specific spot with one finger? That’s a big clue.
The Traveling Pain Show:
SI joint pain is rarely a homebody. It loves to send pain signals to other neighborhoods. You might feel it in:
Your lower back
Your groin
The back of your thigh (but it usually, crucially, stops at the knee, unlike classic sciatica)
On rare occasions, it can even refer a vague ache all the way down to your foot.
The “Ouch” Moments:
Pay attention to what triggers the pain. For me, it was always:
Standing up after a long sit. That first moment was a real killer.
Walking up stairs. Each step felt like a minor betrayal.
Lying in bed on my “bad” side. The direct pressure was intolerable.
Sitting with my wallet in my back pocket. A classic mistake!
The “Giving Way” Feeling:
This one is hard to describe but easy to recognize if you have it. It’s not that your leg is physically weak, but you have this unnerving sensation that your back, hip, or leg is just… unstable. It feels like it might buckle without warning. This is a classic sign of the joint’s proprioception—its sense of position—being off.
SI Joint Pain vs. Piriformis Syndrome vs. Sciatica
Let’s clear up the confusion between these three common culprits:
- SI Joint Dysfunction: The problem is the joint itself. The pain originates there and then travels, often into the groin and lower back.
- Piriformis Syndrome: This is a muscle problem. The piriformis muscle, deep in your buttock, goes into spasm and irritates the sciatic nerve running near it. The pain feels more muscular and can cause true sciatic nerve symptoms.
- Sciatica from a Herniated Disc: This is a nerve problem. A disc in your lower spine bulges and presses directly on a nerve root. This causes sharp, electric, shooting pain, tingling, and numbness that races down the back of your leg, often past the knee and into the foot.
If your main complaint is a lightning bolt down your leg into your foot, think “disc.” If it’s a deep buttock ache with groin pain and a feeling of your pelvis being “wonky,” think “SI joint pain.”
The Root of the Problem: What Causes SI Joint Dysfunction?
So, what makes this brilliant shock absorber turn into a source of constant grief? It usually boils down to one of two problems: the joint becomes either too loose or too tight.
1. The “Too Loose” Problem (Hypermobility/Instability)
This is the most common villain in the story. When those incredibly strong ligaments get overstretched, the joint becomes loose and wobbly. This excessive motion creates inflammation, strain, and pain. What makes it loose?
- A Sudden Jolt: A fall directly on your tailbone, a car accident, or even just missing a step on the stairs.
- Pregnancy and Postpartum: This is a huge one. The hormone relaxin, which loosens ligaments to prepare for childbirth, doesn’t discriminate. It loosens your SI joints too, which can lead to significant pain during and after pregnancy. (To all the moms out there, I see you).
- The Repetitive Strain of Life: Runners, hikers, and nurses—anyone who does a lot of single-leg loading—can slowly stress the joint over time.
- One Leg Being Shorter: Even a tiny difference in leg length can tilt your pelvis and put uneven stress on one SI joint.
- Previous Spine Surgery: Especially a spinal fusion. If your spine can’t move in one area, the motion has to go somewhere else, often straight to the SI joints.
2. The “Too Tight” Problem (Hypomobility/Fixation)
In this case, the joint gets “stuck.” It’s not moving enough. This might sound better than being too loose, but it can be just as painful, as the surrounding muscles clench up in protest. Causes include:
- Osteoarthritis: The classic wear-and-tear arthritis that can grind down the smooth cartilage inside the joint.
- Inflammatory Arthritis: Conditions like Ankylosing Spondylitis can cause inflammation that eventually leads to the joint fusing solid.
- A Body on Guard: Chronic tension and muscle guarding from stress or other injuries can slowly freeze the joint in place.
The Path to Diagnosis and Conventional Treatments
If this is all sounding a little too familiar, your next step is to find a skilled professional—a physiatrist, an orthopedic doctor, or a physical therapist who gets it.
Diagnosis is often a bit of a puzzle. There’s no single perfect test. It’s usually a “preponderance of evidence” based on:
- Your Story: You describing your pain is the most important piece of the puzzle. Be specific!
- Hands-On Tests: The practitioner will push, pull, and move your legs in specific ways to try and reproduce your exact pain.
- The Magic Injection: The closest thing to a “smoking gun” is a diagnostic injection. Using an X-ray to guide them, they inject a local anesthetic directly into the joint. If your pain vanishes for a few hours, you’ve found your culprit.
The conventional treatment path usually looks like a staircase:
- The Basics: Rest, ice, heat, and avoiding the movements that hurt the most.
- Physical Therapy: Strengthening your core and stabilizing muscle groups is the cornerstone of this treatment.
- Medications: Over-the-counter anti-inflammatories can help calm a flare-up.
- The SI Joint Belt: A simple, often-miraculous wide belt that you wear around your hips to provide external compression and stability. It was a game-changer for me.
- Cortisone Injections: For longer-term relief from inflammation.
- Surgery: A last-resort option for when everything else has failed.
What if there was a way to go beyond managing the symptoms? Wouldn’t it be great if our bodies could learn to stabilize themselves? Our journey into yoga starts here.
How Yoga Can Be a Game-Changer for SI Joint Pain
Now, when I say “yoga,” please don’t picture Instagram contortionists in impossible poses. Throw that image out the window. The yoga that helps SI joint pain is gentle, intelligent, and profoundly therapeutic. It’s less about stretching and more about listening and responding.
Here’s how a mindful yoga practice can help you reclaim your SI joint pain:
1. Building a “Core Corset” from the Inside Out
For a loose, unstable joint, we don’t want to create rigid armor. We want to build intelligent, dynamic stability. Yoga teaches you to engage the deepest layers of your core—the transverse abdominis and the pelvic floor. These muscles act like a gentle, living corset, hugging your SI joint pain from the front and taking the pressure off the overworked ligaments in the back.
2. Oil the Hinge
For a stuck, tight joint, we need to restore its tiny, essential movements. Gentle yoga poses carefully encourage this micro-motion, hydrating the tissues and reminding the joint how to move again, like oiling a rusty gate hinge.
3. Rewiring Your Body’s GPS
Remember that “giving way” feeling? That’s a breakdown in your proprioception—your body’s internal GPS. Yoga is a continuous practice in proprioception. It trains your brain to talk to the muscles around your pelvis, teaching them to fire at the right time to keep you stable and secure.
4. Calming the Angry Neighbors
The surrounding muscles, such as the glutes, piriformis and hamstrings, often clench up to protest when your SI joint revolts. You can release tension through yoga, which will soothe these muscles that are overused and relieve secondary pain.
Your Safe and Effective Yoga Practice for SI Joint Pain Relief
A Heart-to-Heart Before You Begin: This is not a “no pain, no gain” situation. This is a “less is more” situation. Your mantra is stability before flexibility. If you feel any sharp, shooting, or increasing pain, back off. You are the expert on your own body. Honor its messages. Please, check with your doctor or PT before starting.
Foundational Principles for Your Practice
Find Your Gentle Core Engagement: Imagine that you are gently drawing in your lower stomach and pulling it up as though zipping up an uncomfortable pair of pants. The crunch is subtle and not hard.
Alignment is Your Friend: Pay attention to the setup of each pose. Good alignment protects your joints.
Move Like Molasses: Slow, mindful transitions are your secret weapon. No jerky movements.
Embrace Your Props: Yoga blocks, a bolster, and a strap are not for beginners; they are for smart yogis. They make poses safer and more effective.
Gentle Yoga Sequence to Soothe Your SI Joint Pain
Try this sequence 3-4 times a week. Consistency is more important than duration.
Warm-Up and Centering (5 minutes)
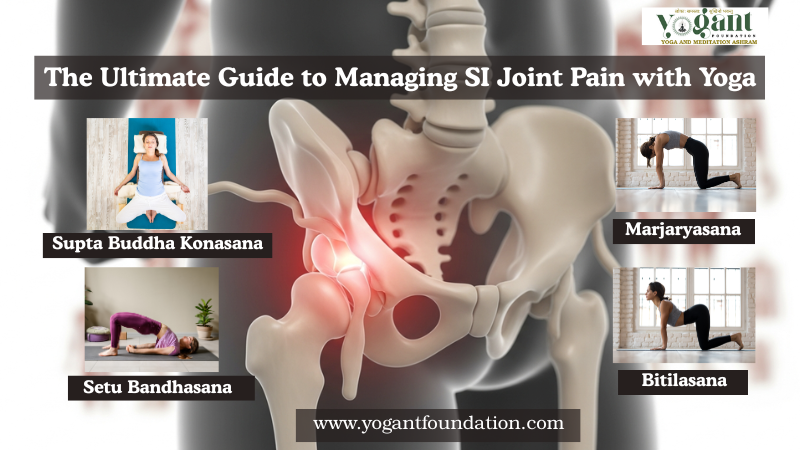
Constructive Rest Pose (Supta Buddha Konasana): After a hard day, this is the reset button I reach for. This is like a warm embrace for your SI and hip joints.
Lie on your back, knees bent, feet flat on the floor.
Bring the soles of your feet together and let your knees fall open into a diamond shape.
This is the key: slide a yoga block, a firm pillow, or a rolled-up blanket under each thigh. This support is everything—it lets your groin and SI joints completely relax. Don’t skip this!
Rest your hands on your belly. Close your eyes. Breathe deeply and feel your lower body sinking into the floor. Stay here for 2-5 minutes. Pure bliss.
Building Stability and Awareness (15 minutes)
Pelvic Tilts (on back):
Stay on your back, knees bent. Inhale, and gently create a small arch in your low back (your tailbone will tilt away from the floor). Exhale, and gently press your lower back flat into the floor (your tailbone will tuck slightly). This isn’t a big movement; it’s a subtle rocking of the pelvis.
Repeat 10-15 times, connecting your breath to the movement. You’re waking up the conversation between your brain and your pelvis.
Bridge Pose (Setu Bandhasana) – Supported:
From the same position, place a block (or a firm pillow) between your thighs. Gently squeeze it—this is your stability trigger.
As you exhale, slowly lift your hips off the floor, keeping the squeeze. Don’t go high; go for stability. Feel your glutes and inner thighs working together.
Hold for 3-5 breaths. Lower down one vertebra at a time. Repeat 5 times.
Cat-Cow Pose (Marjaryasana-Bitilasana):
Come to your hands and knees. As you inhale, soften your belly, let it drop, and lift your gaze (Cow). As you exhale, round your spine like a Halloween cat, tucking your tailbone (Cat).
Move with your breath. This isn’t about flexibility; it’s about gently mobilizing your entire spine and sacrum, reminding it how to move fluidly.
Bird-Dog:
On all fours, engage your core. Slowly extend your right arm forward and your left leg back. The goal is to be as stable as a table. Keep your hips level with the floor—don’t let them tilt!
If this is too much, just tap your hand and foot out and back. Hold for 2-3 breaths if you can, then switch sides. Repeat 5 times per side.
Gentle Strengthening and Mobility (15 minutes)
Goddess Pose (Utkata Konasana) with Block:
Toes pointed out, stand wide-legged. You should squeeze that block as if you were relying on your stability.
Bend your knees into a shallow squat, keeping your spine long. Imagine you’re powerful and grounded. Hold for 5-8 breaths, maintaining that gentle squeeze.
Warrior II (Virabhadrasana II):
From a wide stance, turn your right foot out and your left foot in slightly. Bend your right knee, making sure it stacks over your ankle.
Spread your arms wide. Feel the strength in your legs and the stability in your pelvis. You’re not sinking into the joint; you’re actively supporting it. Hold for 5 deep breaths per side.
Thread the Needle (Supine Piriformis Stretch):
Lie on your back, knees bent. Cross your right ankle over your left thigh, creating a figure-four.
Reach your right hand through the space between your legs and clasp your hands behind your left thigh. Gently pull the left leg toward you.
You should feel a glorious stretch in your right buttock. No forcing! Hold for 8-10 deep breaths per side. This is a fantastic release for the often-angry piriformis muscle.
Cool-Down and Integration (5 minutes)
Supine Twist (with knees bent):
Hug your knees to your chest. Then, let both knees fall gently to the left while you turn your head to the right. Keep both shoulders on the floor.
This is a passive, delicious twist that gives your SI joints and lower back a gentle massage. Hold for 1 minute per side.
Final Rest (Savasana) with Support:
Place a pillow or a pile of bolsters under your legs. It is important to maintain this slight bend. This allows the lower back and SI joint to relax and release.
Cover yourself with a blanket. Let go of all effort. Rest here for 5 minutes, soaking in the benefits of your practice.
Poses to Approach with Caution (or Avoid)
With love and respect for your body, please be very careful with:
- Deep, Asymmetrical Forward Folds: Poses like Janu Sirsasana (Head-to-Knee Pose) can create a twisting force on the sacrum. If you do them, keep a gentle bend in both knees and don’t push.
- Intense Hip Openers: Pigeon Pose can be a minefield. If you’re going to try it, do a supine version (like Thread the Needle) instead.
- Big Backbends: Deep Wheel Pose can compress the SI joints. Stick to gentle bridges.
- Precarious Balances: Standing poses on one leg without proper preparation can challenge pelvic stability. Always stand near a wall for support.
Weaving It All Together: A Holistic Approach to Healing
Yoga is a powerful ally, but it works best as part of a team. Here are some small, daily changes that made a world of difference for me:
- Sit with Intention: Stop crossing your legs! Sit with both feet flat on the floor. A small lumbar roll or even a rolled-up towel behind your lower back can provide wonderful support.
- Sleep Smartly: Side-sleeper? A pillow between your knees is your new best friend. It keeps your pelvis neutral. Back-sleeper? A pillow under your knees is the key to happiness.
- Move Mindfully: When you get out of your car or out of bed, roll onto your side and use your arms to push yourself up. Don’t just do a painful crunch.
- Try the Belt: An SI joint belt is an inexpensive tool that can provide immediate feedback and support, especially during longer walks or busy days.
Your Journey to a Pain-Free Life Begins with Awareness
It can be a frustrating and lonely battle to live with SI joint pain. There is hope. Understanding this part of the body, and adopting a mindful, gentle practice such as yoga will help you to move from being a victim of pain, to becoming the one driving your own healing.
This journey isn’t about touching your toes or mastering a handstand. It’s about learning to listen to the whispers of your body. It’s about building a relationship with yourself based on kindness and curiosity, not frustration and force.
Celebrate the small wins. The first time you stand up without a wince. The first pain-free night’s sleep. The renewed confidence as you walk through your day. These moments add up.
You have the strength within you to calm this storm. Unroll your mat, take a deep, kind breath, and take that first small step today. You can do this.